Difference between revisions of "Virindi Tank Meta System"
(→Community Examples) |
m (→Public Meta Repository) |
||
| Line 128: | Line 128: | ||
= Public Meta Repository = | = Public Meta Repository = | ||
| − | <i>Disclaimer: Use at your own risk. The authors take no responsibility for any effect on your characters. Read all instructions.<i> | + | <i>Disclaimer: Use at your own risk. The authors take no responsibility for any effect on your characters. Read all instructions.</i> |
<br> | <br> | ||
Visit the [[Public Meta Repository]] | Visit the [[Public Meta Repository]] | ||
Revision as of 17:34, 30 January 2014
Contents
Introduction
The Virindi Tank Meta system is a way to control what the macro is doing on a higher level than normal operations. The system allows you to implement a Finite-state machine. This machine consists of rules and states. For Meta to operate, the Enable Meta Actions checkbox on the Profiles tab must be checked.
Rules and States
A state is merely a name that you assign for some stage the macro will be in. For example, "hunting", "buying comps", or "died running back". The macro is only in one state at a time. When you first log in, it is in the "Default" state. You can manually change the current state using the dropdown box in the bottom left corner of the meta tab.
A rule consists of a state, a condition, and an action. Rules are only checked if their state is the same as the current macro state. Each rule only happens once per time the macro is in a particular state (rules that have already run are listed in red in the main list).
As the macro runs, it looks at all the rules which haven't run yet with the same state as the current state. If the condition is true, the action listed in the rule is run.
Adding a Rule
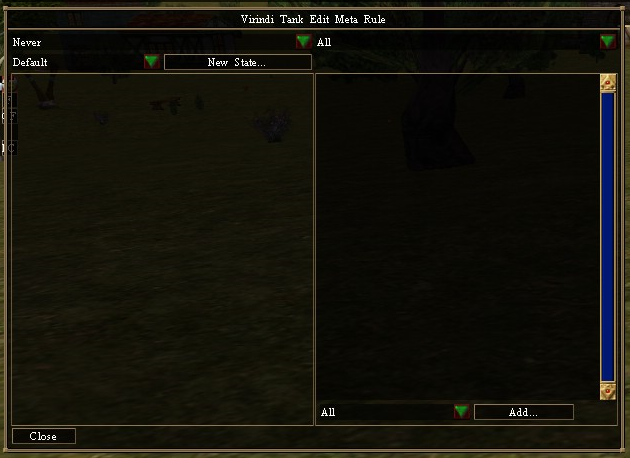
When you add a rule, you get this interface. The left side of the panel is where you define the rule's condition and state, and on the right side you define the rule's action. Condition is the upper left box and state is below it.
Conditions (Left Side)
- Never: Never act upon.
- Always: Always act upon.
- Any: Act upon any.
- All: Act upon all.
- Chat Message: Act upon Chat Message.
- Pack Slots <=: Act upon Pack Slots less than or equal to X.
- Seconds in State >=: Act upon Seconds in State greater than or equal to X.
- Navroute Empty: Act upon an empty Navroute.
- Character Death: Act upon Character Death.
- Any Vendor Open: Act upon Any Vendor Opened.
- Vendor Closed: Act upon Any Vendor Closed.
- Inventory Item Count <=: Act upon Inventory Item Count less than or equal to X of item.
- Inventory Item Count >=: Act upon Inventory Item Count greater than or equal to X of item.
- Monster Name Count Within Distance: Act upon X number of specific monster name within range of X.
- Monster Priority Count Within Distance: Act upon X number of priority monsters within range of X.
- Need to Buff: Act upon need to buff.
- No Monsters Within Distance: Act upon no monsters within range.
- Landblock ==: Act upon specific landblock (larger area).
- Landcell ==: Act upon specific landcell (smaller area).
- Portalspace Entered: Act upon entering portalspace.
- Portalspace Exited: Act upon exiting portalspace.
- Not:
Actions (Right Side)
- Set Meta State: Allows you to set/change Meta state after X Action has occurred.
- Chat Command: On Action do X Chat Command. (eg. On Character Death do Chat Command /f I have died =( )
- All: Allows multiple Reactions to Occur.
- Load Embedded Navroute: Allows you to embed a navroute in to a meta
Example
For example, you might want your character to run back to the battle when they die. You would have two routes: "runback" is a "once" route that takes you from your lifestone to the battlefield, and "fighting" is a normal route that is used while you are at the hunting area.
The first rule you need sets the state when you die, so you can begin performing actions. So you'd make a rule like this:
State: "Default", Condition: "Character Death", Action: "Set Meta State: dead"
Once your character dies the macro will switch the state to "dead", and when that happens you want to immediately perform a series of actions, like this:
State: "dead", Condition: "Always", Action: "Chat Command: /vt nav load runback"
State: "dead", Condition: "Always", Action: "Chat Command: /vt opt set enablebuffing true"
State: "dead", Condition: "Always", Action: "Chat Command: /vt opt set enablenav true"
When the "once" route "runback" has been run to the end, the nav route will be empty and it is time to resume hunting. Check for that like this:
State: "dead", Condition: "Navroute empty", Action: "Set Meta State: back"
To resume hunting, you need to do some more actions...
State: "back", Condition: "Always", Action: "/vt nav load fighting"
State: "back", Condition: "Always", Action: "/vt opt set enablecombat true"
And return the macro to the starting state.
State: "back", Condition: "Always", Action: "Set Meta State: Default"
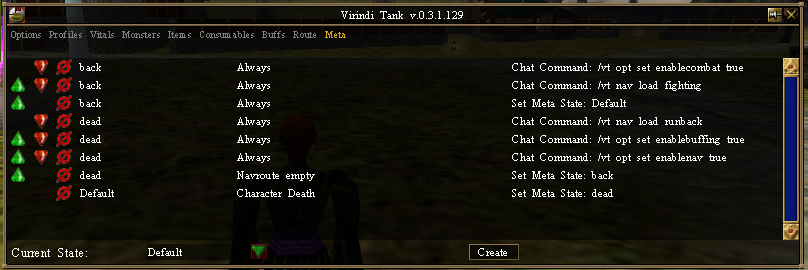
The result should look something like this:
A copy of the profile for this example can be found here. To use it, extract the .met file to your Virindi Tank profile directory (typically c:\games\virindiplugins\virinditank).
Community Examples
Disclaimer: Use at your own risk. The authors take no responsibility for any effect on your characters. Read all instructions.
There are many different types of meta profiles that can be created. From simple hunting profiles that run back to your dungeon on death(see above), to more complex systems of control and automation.
Over time, this section will be updated with example meta's of all types.
Some may work for you immediately, others may require a bit of customization
Beware: Chat commands in the examples will be open ended. Meaning, anyone can trigger the commands that are in place.
To protect yourself, you can make them character specific so you only accept them from approved names.
Look for the chat command RegEx, it will appear as ^.*().* (say|says|tells you), \"!command\"$ or something similar
Add the character names you want to accept commands from within the (). You can add multiple names by separating with a |
For example:
^.*(Character1|Character2).* (say|says|tells you), \"!command\"$
To accept commands from a specific chat channel you can do:
\[Allegiance\] ().* (say|says), \"!command\"$
\[Fellowship\] ().* (say|says), \"!command\"$
You can use any chat channel you have your client listening to (they do not need to be in an active chat window, as long as they are checked in Options - Character tab)
Town Network Routes - By The Art of War - Routes to any portal within the TN. All routes start from Annex side drop, Say !townname to route.
Celdiseth Recomp - Recalls Sanctuary, uses Celdiseth Gem and attempts to recomp. Requires current Mag-tools, Sanctuary recall, Celdiseth gems and a Celdiseth VTclassic profile.
You must edit the "Return" state and add your "runback" meta to /vt meta load
SplitProfile - One profile that launches in to multiple profiles based on character inventory (to reduce amount of commands.)
Withered Hill Portal Drag - If pulled in to portal on withered hill, recalls primary and resets route (input your routes)
Simple Multi-Character Controls - Very basic multi-character controls for "Command Meta" reference
Dangerous Portal Device Auto Nav - Auto Nav to destination of choice (AL, OP, or VOD) (/hom to Yanshi Mansion)
Dangerous Portal Device Auto Nav (Magtools cmds) - Auto nav to destination of choice (AL, OP, or VOD). Requires current mag-tools and DPD device either on patio, or hook near your mansion portal drop. Read the default state for commands.
Public Meta Repository
Disclaimer: Use at your own risk. The authors take no responsibility for any effect on your characters. Read all instructions.
Visit the Public Meta Repository

